Page 12 of 16 FirstFirst ... 28910111213141516 LastLast
Results 276 to 300 of 376

Thread: Bagged B18 '88 DX Coupe Build!

  1. #276

    B0CKS's Avatar
    Join Date
    Jul 2016
    Vehicle
    1988 DX Coupe
    Location
    Detroit MI
    Posts
    334

    Re: Bagged B18 '88 DX Coupe Build!

    Well, it’s been a whirlwind of a week and a half, and only a metric ton of things have happened, enough to justify posting twice! Lots and lots and lots of small stuff happened, a few big things, and- as ever, my attention span has been bent five different ways, so there’s going to be some random junk in here, as is tradition. So I’ll do my best to recall most of it, with fun images included for those of us who HATE reading.

    Let’s start with the mail! What cool boxes are coming/arrived lately? Well, for starters, I got my quick release bumper hardware in! Basically a threaded peg with a button that fastens onto the bumper. For ebay stuff, they feel great, and fit nice! I’ll mount two on the top, then two on the bottom, should be a pretty clean install. The paper is a mockup of the lasercut piece I’ll be making to adapt the Prelude plastic to fit the Accord support!
    Click image for larger version. 

Name:	IMG_5711.jpg 
Views:	68 
Size:	229.6 KB 
ID:	10444
    Then, from the motherland of Japan of itself, I (overpaid) bought a fog light switch! The since the Prelude button won’t fit my application, I was able to score this one!
    Click image for larger version. 

Name:	IMG_5714.jpg 
Views:	70 
Size:	198.0 KB 
ID:	10445
    And hey, speaking of; what about another thing that showed up in the mail on the same afternoon! Sure! I did not expect to be doing this, but I was able to pick these up for (what I’m positive is under market value) 250 bucks, branded correctly with the right words on the front, and even cooler? They’re Ambers!! I’ve been kinda aware of this set of lights for some time, but finally reached out to the owner, and was stunned to find out they were in the price range of attainable, I assumed they would be out of budget for some time! Way too geeked about them!
    Click image for larger version. 

Name:	IMG_5710.jpg 
Views:	72 
Size:	334.9 KB 
ID:	10446
    Very exciting here- a box from my favorite company, SendCutSend (wait, it might be Honda. TBD) showed up!! This pack of 2.6mm thick steel is the answer to all the heavier- weight reliant parts I’ve been designing! The large arm with an elbow is the the airbox backer, the small center piece is the mounting bracket for my heater core valve (exciting, I know) and the last two- well we’ll get to them next.
    Click image for larger version. 

Name:	IMG_5775.jpg 
Views:	65 
Size:	476.0 KB 
ID:	10448
    Those two other brackets and their respective triangles are my custom made fog light brackets! While they’re just laid in place in place, both of them have since had that triangle (adequately) welded in and then both powdercoated my favorite black. They feel PLENTY sturdy, and fit better than I hoped!
    Click image for larger version. 

Name:	IMG_5779.jpg 
Views:	76 
Size:	199.7 KB 
ID:	10447
    Since I have no clue how to leave well enough alone, I couldn’t help but sneak a peak of the near-final look of the front end of this car, and threw the front end on and MAN, I can’t describe how much I love how this coming together. The Prelude bumper just packs a restrained punch of chunky and aggressive, the Integra lip finishes off the silhouette so well, and the fog lights and Manarays look so rad and technical- I can’t get over it. Couldn’t be more excited about the way this parts-bin car is falling into place!
    Click image for larger version. 

Name:	IMG_3238.jpg 
Views:	262 
Size:	180.4 KB 
ID:	10449
    Click image for larger version. 

Name:	IMG_3241.jpg 
Views:	187 
Size:	180.0 KB 
ID:	10450
    And, while we’re at it, my sister and her cat dropped by- and I guess I took the best picture of my entire life. Glad I got that out of the way!
    Click image for larger version. 

Name:	IMG_3247.jpg 
Views:	67 
Size:	150.3 KB 
ID:	10451
    Bagged, Type R swapped, eternal project 1988 Honda Accord DX Coupe, 1985 Honda Spree

    Build thread! https://www.3geez.com/forum/project-...upe-build.html
    [SIGPIC]


  2. #277

    B0CKS's Avatar
    Join Date
    Jul 2016
    Vehicle
    1988 DX Coupe
    Location
    Detroit MI
    Posts
    334

    Re: Bagged B18 '88 DX Coupe Build!

    Reaching back to the topic of things I’m pouring out way more cash on than I should be- specifically on things I didn’t expect to be buying until after the car was painted, I guess I’m going Coil On Plug Honestly, on my factory rebuild I’m not expecting much of a performance change, but I really love the aesthetic of coil on plug and the performance appearance and have been planning to do the upgrade for the better part of a year, but I do know that distributors are a weak link in B-series, and being able to mostly swap out that system is a great thing! Now why am I buying them now? There was a deal that was a little too good to pass up! I was expecting to spend roughly a grand one just the components needed for this upgrade, and this purchase included what is a considerably valuable item- a P28 Hondata S300 V3- which will soon be replacing my V1 S300! This setup set me back an honest 850, but considering that ECU alone is roughly 500, I’m happy to pay it!
    Click image for larger version. 

Name:	IMG_5874.jpg 
Views:	58 
Size:	191.1 KB 
ID:	10452
    And in terms of menial tasks, I’ve done lots, like LOTS. New OEM fuel filter, new crush washer for the gas tank, fresh gas, painted my battery tray in weldable primer, cleaned, swapped cases and rebuilt my turn signal assembly, rebuilt and swapped out some components on my gauge cluster, tidied up my wiring harness’, cleaned out both barns, sold and shipped parts, re-aligned my whole car to now be somewhat level and have equal amounts of caster, gave the deck lid a night’s worth of attention and learned a lot about where my air ride is happy and upset, the list goes on.
    Click image for larger version. 

Name:	IMG_5747.jpg 
Views:	62 
Size:	270.9 KB 
ID:	10453
    Oh! Here’s something fun, I actually wrapped enough projects to have “down-time” and while being stalled for things for to do, I decided I would re-attach my collection of Carrozzerias (I uhhhhhhh, I have six.) and do some sorting and planning. I have one “complete” set that I’ll be able to restore back to factory, but I’ve been forming plans to give the spares to have a second wind, so that when I do have a second “rad” vehicle with a package shelf, I’ll be able to adorn the second with a matching pair of my favorite rear speakers, even if they’re not totally factory spec.
    Click image for larger version. 

Name:	IMG_5816.jpg 
Views:	59 
Size:	342.8 KB 
ID:	10454
    Then this isn’t “huge” news, but I tested up the wiring I did a few months back that spliced into my taillights actually WORKS. There’s a few bulbs that are toast on the ones I have plugged in, but they look great, I absolutely love the color of and amount of light they emit. Just another thing that makes me excited.
    Click image for larger version. 

Name:	IMG_5817.jpg 
Views:	63 
Size:	190.2 KB 
ID:	10455
    And alright- straight ADD? Sure. I had a spare hour in a car to let my mind be dumb and do it’s thing. And here’s what I came up with. While I have an exacting battle plan to make it, the answer is NO, not gonna do it. But just to doodle it in, I designed the Accord “Aero-Mask” a fictional Honda Access item that floats over the front bumper (in clearance of the headlights) and is a stone chip guard. Inspired from the 1G CRX hood wind deflector thing, that thing is sweet. I mean I guess it just looks like bifocals, and would need to be opened up a bit from the bottom to let air flow through to the top of radiator, but I’m having fun. A few lasercut brackets, a large sheet of heated and bent plexi, then some frosted vinyl, and then boom, maybe less stone chips.
    Click image for larger version. 

Name:	IMG_5717.png 
Views:	56 
Size:	337.1 KB 
ID:	10456
    Click image for larger version. 

Name:	IMG_5718.png 
Views:	56 
Size:	123.8 KB 
ID:	10457
    Last note here, but I’ve been beating my head against the wall for final wiring. I’ve gotta sort out the fan and starter switch, and I’ve patiently waiting for a friend to drop by sometime and clear the last of the fog in my head, and that was supposed to be last Saturday, which coincidently was supposed to lead to turn key. So that didn’t quite go as planned as our schedules didn’t line up, but we’re getting there. So, after dropping nearly half of the wiring out the dash I got the car TO CRANK UNDER ITS OWN POWER YESTERDAY. I mean, it doesn’t count, the way I had it wired if the battery had both terminals on, it would crank. That is wrong. But it DID, and I’m still a little amped about it. We’re SO CLOSE to driving it!
    Click image for larger version. 

Name:	IMG_5876.jpg 
Views:	62 
Size:	240.6 KB 
ID:	10458
    But all that typed out (only took like an hour!) I gotta go fix a leaky injector and try and look at wires harder. Hopefully an update comes quicker than this one did!
    Bagged, Type R swapped, eternal project 1988 Honda Accord DX Coupe, 1985 Honda Spree

    Build thread! https://www.3geez.com/forum/project-...upe-build.html
    [SIGPIC]

  3. #278
    LX User Jinnai's Avatar
    Join Date
    Jul 2020
    Vehicle
    1988 Honda Accord LXi Hatchback
    Location
    Colorado Springs
    Posts
    104

    Re: Bagged B18 '88 DX Coupe Build!

    Very cool! I love JDM options. Where might I look for such things? Do I need to know japanese?

  4. #279

    ShiRen's Avatar
    Join Date
    May 2018
    Vehicle
    87 Accord DX
    Location
    MO
    Posts
    1,184

    Re: Bagged B18 '88 DX Coupe Build!

    The mask... I don't know how I feel about it, but odd catalog accessories, fictional or not, make me feel tingly.

  5. #280

    B0CKS's Avatar
    Join Date
    Jul 2016
    Vehicle
    1988 DX Coupe
    Location
    Detroit MI
    Posts
    334

    Re: Bagged B18 '88 DX Coupe Build!

    Quote Originally Posted by Jinnai View Post
    Very cool! I love JDM options. Where might I look for such things? Do I need to know japanese?
    Buyee.com is a GREAT place to look! It's perfect for what you're looking for. It's a Importer that lets you browse all of yahoo actions (basically our ebay) and then takes care of getting items shipped here. Go surf around on it and find good stuff!

    Quote Originally Posted by ShiRen View Post
    The mask... I don't know how I feel about it, but odd catalog accessories, fictional or not, make me feel tingly.
    Hahahaha, finally someone puts it into words! I mean, the Air purifiers, map lights, coin trays, rainguards, fictional plexiglass masks, they're not too aesthetically pleasing, but rare and desirable odd stuff, and I'm so in! Couldn't agree more lmao
    Bagged, Type R swapped, eternal project 1988 Honda Accord DX Coupe, 1985 Honda Spree

    Build thread! https://www.3geez.com/forum/project-...upe-build.html
    [SIGPIC]

  6. #281

    B0CKS's Avatar
    Join Date
    Jul 2016
    Vehicle
    1988 DX Coupe
    Location
    Detroit MI
    Posts
    334

    Re: Bagged B18 '88 DX Coupe Build!

    Well. It’s been a minute.

    The “turn key date” has been kicked back, and kicked back, and kicked back. I was going to save posting stuff until the car was running, but it’s been too long, the car is just sitting, and well, I’ve been doing what I can to get it all sorted, but we’re still on hold. Here’s what’s happened in the ~20 days since we last talked.

    I almost bought a 54 Bel Air! Stumbled across a great deal, condition, patina, overall example of one the dream cars of mine and was painfully close to going out and buy it. But I let it pass, much to the joy of my Accord, and getting it done within my lifespan. But let’s get going on real updates that actually exist, beginning with the projects of orbital importance.

    Got my 3D printer into its box after like 7 months of it just not being in there and wired up to it’s new and (greatly improved) heating plate. This will allow me to reliably print more robust, weather enduring prints- talking about spoilers specifically- out of good, but more troublesome filament.
    Click image for larger version. 

Name:	IMG_5979.jpg 
Views:	53 
Size:	488.4 KB 
ID:	10467
    Then, let’s talk lasercutting. I’ve designed the third iteration of my airbox, and minus a mockup, it should be good to be shipped off. I’ve also made a bracket that surrounds my outlet power in the center console as well as protected for the two heated seat buttons that will be living there in the future. And, shown here, is a mockup of my very tightly packaged answer to my Carrozzeria question. I’m basically facing the music that getting an original set of these things with decent foam is just not really in the cards, especially after dumping in more cash I care to admit into them. And, honestly, I plugged one into the car (with the best condition speakers I had) and it was pretty darn underwhelming. So I’ve come up with this plate for a set of component speakers I bought forever ago, fits the very tight (and unique) cutout that the Carrozzeria uses without any need for cutting or trimming the actual plastic. So, not my first choice, but reliable sound and a sweet box to hold them in is a win in my book. The plate will be powdercoated black, so it should all blend, neat.
    Click image for larger version. 

Name:	Capture.JPG 
Views:	51 
Size:	105.5 KB 
ID:	10468
    Wiring is the next thing I’ve been doing battle with. I’ve been learning a lot, which is really hard on the gears in my head, but I do feel like I’m getting less scared of one of the black boxes that terrorize me in terms of working on cars, which is admittedly a good thing. I spent one night building the gauge cluster adapter, depinning and using the harness that came out of the dash of the B-cord so that I don’t fry anything I can’t undue with the harness I want to protect.
    Click image for larger version. 

Name:	IMG_5879.jpg 
Views:	57 
Size:	363.8 KB 
ID:	10469
    So installation aside, this plugs directly into the Rywire setup, and feeds the dash important info like tach, oil pressure, maintenance lights, check engine, and other fun stuff. Honestly, for some moron who can only almost use a multimeter it looks decent.
    Click image for larger version. 

Name:	IMG_5880.jpg 
Views:	50 
Size:	346.0 KB 
ID:	10470
    Then, harness number two is the main power harness. Carrying the important job of sending the starter signal and ECU power to the Rywire harness. It’s currently the bane of my existence, as if I have both wires plugged in, only the ECU gets power, and if I unplug the ECU wire, the car will crank. About that multimeter work I have to do….
    Click image for larger version. 

Name:	IMG_5935.jpg 
Views:	72 
Size:	115.2 KB 
ID:	10471
    But let’s hop into the sweet meat and potatoes of this post with the Coil and Plug setup! Showed up plenty quickly, and I’m very excited!
    Click image for larger version. 

Name:	IMG_5899.jpg 
Views:	49 
Size:	524.6 KB 
ID:	10472
    And straight into the weeds with the holdup, I spent nearly four HUNDRED dollars and bought what is called a EPM (engine position module) by the company I renown, AEM. This hockey puck is a freaking gun in a knife fight for a shaved buy, it reduces the need for a the huge, blocky distributor, and getting it in place is a breeze, and four wires later, it should be wired in.
    Click image for larger version. 

Name:	IMG_5955.jpg 
Views:	56 
Size:	311.0 KB 
ID:	10473
    This is where it gets kinda funky, after much reading, dismay and confusion, I came to learn that the AEM EPM does NOT play nice with any Hondata, and is only designed for fully standalone applications. SO, that sucks. I have to compromise, or spend upward of 3k to make it work with a totally new wiring setup (which is not in the cards). And well, so be it. I returned the hockey puck. But here’s the thing, in my haste to offset the cost of the EPM, I sold my distributor and spark plug wires that I thought to be obsolete. Which isn’t relevant information until I point out that the distributor that came with the COP setup is totally gutted, and is missing some CRUCIAL parts I’d need to harvest from the other distributor. So I shot my own foot really well and now gotta wait another half week before I can make a car with spark, not to mention I also purchased fuel injectors that I recently flow at 280CC instead of the factory 240CC, so now I gotta spend that cash as well wait for them to show up ACK.
    Click image for larger version. 

Name:	IMG_5968.jpg 
Views:	52 
Size:	321.8 KB 
ID:	10474
    Oh, and I powdercoated the billet cover black, it’s not going into that engine bay all chrome like that. No sir. Plus the milled surface of that aluminum is going to fade fast, and it’s not worth the maintenance. So next time you see it! And, it turns out that the female connectors for these coil packs are quite brittle, and upon receiving them, two of them were disconnected, and so, 10 dollars and a week’s worth of shipping later, replacement connectors have been installed!
    Last edited by B0CKS; 12-02-2020 at 06:50 AM.
    Bagged, Type R swapped, eternal project 1988 Honda Accord DX Coupe, 1985 Honda Spree

    Build thread! https://www.3geez.com/forum/project-...upe-build.html
    [SIGPIC]

  7. #282

    B0CKS's Avatar
    Join Date
    Jul 2016
    Vehicle
    1988 DX Coupe
    Location
    Detroit MI
    Posts
    334

    Re: Bagged B18 '88 DX Coupe Build!

    Alright, time for a Black Friday exclusive post! Time for some 200% ADD content.

    With the Accord down for the effective count, I spent some time (and, a grand total of 30 bucks) distracted. Black Friday means some pretty wild deals for the pick n pulls here, the yard I went to was half off EVERYTHING. I was hoping to find some cheap tread, but ended up entranced with this 3G civic that was in the yard, and- my brain rapidly justifying my actions- I pulled the front upper end off it. Setting me back an INCREDIBLE SIXTEEN DOLLARS out the door, I was stunned.
    Click image for larger version. 

Name:	IMG_5996.jpg 
Views:	53 
Size:	289.7 KB 
ID:	10480
    IF I ever do get to own one of these gen Civic/CRX’s, the recessed headlights look 200% more good than the flush headlight models on this platform, so I kinda wanted to grab these and put them in my back pocket for an eventual highly hypothetical situation. BUT, what the heck should I do with them in the meantime? Throwing these fragile plastic parts in storage seemed like no fun, and they’re big, and fun to look at when they’re not in some dimly lit corner. The answer to that was clearly MAKE A LAMP. With some zip-tie ju-jitsu and a pair of hastily made brackets It’s all one piece.
    Click image for larger version. 

Name:	IMG_6018.jpg 
Views:	56 
Size:	288.0 KB 
ID:	10479
    Then, I took a whole bunch of supplies we had around the barn (and never use) and built a simple wiring harness, enough to get everything to be powered by one simple source, with an RF remote to dim and activate along with a 12v wall outlet power supply that’s coming in the mail at the moment.
    Click image for larger version. 

Name:	IMG_6017.jpg 
Views:	57 
Size:	311.5 KB 
ID:	10475
    And, powered up, tada! It emits light, is a single chunk, and was a great way to kill a late night in the barn. It was a lot of fun spending a night doing something that put the skills to use, but had no real importance, just make it work!
    Click image for larger version. 

Name:	IMG_6029.jpg 
Views:	49 
Size:	256.8 KB 
ID:	10476
    BUT. The fun didn’t end there, before I wired it up and made my brackets, I did the right thing and took a few components off my car and…
    Click image for larger version. 

Name:	IMG_6006.jpg 
Views:	59 
Size:	261.0 KB 
ID:	10477
    Well, it fits nicer than it should.
    Click image for larger version. 

Name:	IMG_6009.jpg 
Views:	50 
Size:	255.9 KB 
ID:	10478
    Obviously, no, this is not what I have any intention of doing, but I gotta say, I like the concept a lot more than I’m allowed to. Maybe on some 500 dollar gambler car I’ll make the illustrious E-AT Civic coupe with a bunch of crappy metalwork, but until then, we have these pictures to chuckle at.
    Bagged, Type R swapped, eternal project 1988 Honda Accord DX Coupe, 1985 Honda Spree

    Build thread! https://www.3geez.com/forum/project-...upe-build.html
    [SIGPIC]

  8. #283

    ShiRen's Avatar
    Join Date
    May 2018
    Vehicle
    87 Accord DX
    Location
    MO
    Posts
    1,184

    Re: Bagged B18 '88 DX Coupe Build!

    Wow speak of the devil, I wouldn't have gave it 2hrs more before I made and posted a "Honey its time for a build update post" meme just for you. I find it extremely strange the aem cam position sensor is incompatible with Hondata, or what I assume to be anything that expects the factory optical sensor... like why wouldn't it just use a factory optical sensor? Has aem squeezed more resolution out of it? Did anyone ever need any more cam position resolution? Im sure there is a market for a cop set up on Hondata or equivalent that does not use a gutted factory dizzy.

    Totally completely off topic, but have you considered a speedo and tach swap? I have been wanting to get rid of the cable speedo for a long time and you are going to be able to peg our tach. I bought a eg cluster banking on it working, I will have to get the speedo working with an arduino. I will share the code ofc, but I am also using the arduino for fuel level and you have trans options that can actually drive the speedo provided you wire it up.

  9. #284

    B0CKS's Avatar
    Join Date
    Jul 2016
    Vehicle
    1988 DX Coupe
    Location
    Detroit MI
    Posts
    334

    Re: Bagged B18 '88 DX Coupe Build!

    Gosh DANGIT, time keeps on happening, and I keep forgetting to write these things, stupid fundamentals of the universe messing with how lazy I’d like to be.

    It’s been a minute- some stuff happened, other stuff, well- didn’t. The car is in a very weird state at the moment, as there’s some stuff I’m simply dreading fixing, and other stuff I couldn’t be more excited for, and so my motivation to actually do things has been coming in waves, and then rushing out. So what’s the big holdup? Still wiring. I DO NOT LIKE IT. I don’t have a great understanding of it, and when it doesn’t work, I have no idea how to fix it, which means that I just need to do more wiring, so I can learn the “why” when stuff is broken. I can’t wait. So the overall “car” progress has been real slow. But ADD around the rest of the car project while pretending not to see the main glaring projects has been very good, at like an all time high really.

    Let’s start with the mail, after watching for one for a (long) time, I happened to stumble across a Facebook post in a 1G CRX forum with a guy looking to buy a car cover, and there’s a handful of comments, some tags, others irrelevant. One guy comments and has some for some 80s Hondas, and so- I reach out to him, ask him about some details, and much to my amazement, he has one- for a 3G Accord, more specifically, an Accord Coupe, and before I knew it, my PayPal was open and sending him cash. And holy COW. I’m so excited about this. I haven’t fully unwrapped it, but here is an effectively new, with manual and everything, Accord Car Cover. WAY too cool. Haven’t had it on the car yet, but boy am I excited.
    Click image for larger version. 

Name:	IMG_6072.jpg 
Views:	35 
Size:	292.1 KB 
ID:	10502
    Click image for larger version. 

Name:	Capture1.JPG 
Views:	34 
Size:	125.5 KB 
ID:	10503
    What else? Lets see here, I got wind of a program that uses older Xbox Kinect Cameras to do some (very primitive) 3D scanning, so I went for a gamble on Facebook marketplace, and found one that happened to be new in box for 10 bucks, and went to pick it up, and happened also be literally given 26 Xbox games, most of them the biggest names Xbox had, most every halo game, CoD, GTA, Borderlands, all the hits, felt like a huge score!
    Click image for larger version. 

Name:	IMG_6057.jpg 
Views:	31 
Size:	215.6 KB 
ID:	10501
    But in first place, HOLY CRAP. I had no idea the day would come, but I am currently waiting on an audio device of my dreams. Let’s throw some background into this; the Panasonic Cockpit is a rare piece of novelty Car Audio equipment that takes the standard radio, Cassette deck and then a humble amp, and then puts them on the HEADLINER OF YOUR CAR. There’s a few different versions, the RM310, RM610, and RM710 being the most desirable. I’ve seen some 310s on eBay for sale, one new in box for 1600, another one currently for sale for 1100, and much like the car cover, I happened to stumble across an extremely rare RM710 that was new in box, with a guy waiting for responses at the bottom of an older thread on some wing of the Lotus forums. And after some incredible discussions, I learned that he only wanted THREE THOUSAND, FIVE-HUNDRED dollars for it. Not to mention shipping from France, so let’s add another 500 for shipping and call it fair. That was about two miles out of my price range, so I went back to scrolling eBay empty handed, when a RM310 popped up with 400 dollars at the starting bid. Let’s cut the week of wait time out, and just say I was able to score it for a clean $570+ some shipping. Roughly half of what any other one of these is commanding. Consider me starstruck, and from the looks of it, in great shape too! Supposed to be here tomorrow, I’m sure there will be pictures to follow!
    Click image for larger version. 

Name:	s-l1600.jpg 
Views:	34 
Size:	273.4 KB 
ID:	10500
    But I gotta say, between this and the Carrozzerias, I absolute love the 80s tech feeling this car is taking on. I’ve already started to get my brackets planned and a game plan for wiring. Can’t WAIT.
    Click image for larger version. 

Name:	s-l1600 (1).jpg 
Views:	37 
Size:	135.0 KB 
ID:	10499
    And actually- that leads me very nicely into the other half of these posts- design! With Cockpit coming, I have to sort out what to do with the OEM radio location. I don’t want to put another radio there, as that’s redundant- and probably going to result in a wiring nightmare. So, What should I do with this space? First assumption was switches, but in all honesty, I don’t really have anything that needs more switches than what’s already available, second guess was more gauges, but there’s nothing I could find that didn’t just look ricey- so that was a pass, then my brain switched to audio tech. I need something that would look 80s esque, but be a primarily aesthetic piece. The closest fit I could find for what I’m looking for is this Calcel VU meter-faced amp. https://www.ebay.com/itm/Old-School-...r/124427953992 Clean and free of the over-shaped garbage that seems to clog up so many radio, I found it’s subtle look was a good fit. Unfortunately its just SOOOOO BLUE. Which is a color I’ve been trying to avoid (and have gone pretty good lengths to) keep out of this build so that its consistent. So I’m hesitant, although I’m still stumped on a better option. But that didn’t stop me from going down the rabbit hole of VU meters and spectrum analyzers, eventually finding this “AK7115 Spectrum Analyzer” a very clean and simple unit, https://www.ebay.com/itm/164503448957 with the easiest wiring I have chances of coming across. It’s biggest issue? It’s too small to properly fill a single DIN slot… which well, you know me, I took an evening in illustrator and clicked away, then here’s the result:
    Click image for larger version. 

Name:	work.jpg 
Views:	33 
Size:	211.8 KB 
ID:	10497
    I think it may still be a little too modern for this Accord, I’d have to round out a few edges, change some finishes, but this is the top two that sang to me (worth noting, the area on the right would be storage for the IR remote for changing the style of the Spectrum Analyzer), and I think they have a good thing going, but I’m hesitant to flush funds down the fully custom hole when I still think I could find something off the shelf that could fit the bill, and *actually* be period correct.
    Click image for larger version. 

Name:	AK7115.jpg 
Views:	35 
Size:	80.9 KB 
ID:	10498
    So I’m not sure yet. Still considering my options.
    Last edited by B0CKS; 12-09-2020 at 11:41 PM.
    Bagged, Type R swapped, eternal project 1988 Honda Accord DX Coupe, 1985 Honda Spree

    Build thread! https://www.3geez.com/forum/project-...upe-build.html
    [SIGPIC]

  10. #285

    B0CKS's Avatar
    Join Date
    Jul 2016
    Vehicle
    1988 DX Coupe
    Location
    Detroit MI
    Posts
    334

    Re: Bagged B18 '88 DX Coupe Build!

    But next up in the canister for design work is laser cutting updates! SendCutSend recently held an open ended Sticker contest, and as I can’t help myself, I doodled some up in Illustrator and entered, and much to my surprise, I won! And am flattered to have made a small impact on their fantastic company, and have also already made quick plans on what I’ll be spending my 100 dollar reward card on! That, of course, is the huge file from a few posts back, including the airbox, Prelude bumper adapter, Carrozzeria adapters (and a Turbofan for the cowbells, because why not), but a few of these parts needed to be updated for a final check before I send them off, so here’s the final iteration of the airbox, in Cheeto orange next to its predecessors! Everything fits right after a few small tweaks, the design feels tight, and it’s ready to be cut as a final piece!
    Click image for larger version. 

Name:	IMG_6110.jpg 
Views:	30 
Size:	239.9 KB 
ID:	10504
    Then, mentioned in the last post, here’s the finishing bracket for the center console, the outlet closeout, again in blaze orange. The two large holes are for heated seat switches! Then, those two horizontal slots under them are tabs that fold back for mounting this plate. Not a bad lil setup! I also finally built the wiring harness for this, so it’s ready to be a plug and play piece once the car eventually comes together!
    Click image for larger version. 

Name:	IMG_6100.jpg 
Views:	29 
Size:	205.6 KB 
ID:	10505
    I think that covers the big stuff, as for things in the works, I’ve got the new distributor wired in, I’ve started work on a custom cut kit of Paint Protection film for the front end of our cars (along with a small piece to cover the rear top corner of the quarter panel- for the spoiler!). And my 3D printer is officially back up and running, and after kicking out some PLA prints, I’ve loaded it ASA and have completed my first large scale UV and temp resistant part! Still needs some dialing in, but I’m very excited about how its going! And last off, after literally talking to a guy for six months, I’m happily picking up a very clean set of third gen Prelude Si hubcaps… for future builds!
    Click image for larger version. 

Name:	Capture34.JPG 
Views:	32 
Size:	154.5 KB 
ID:	10506
    Bagged, Type R swapped, eternal project 1988 Honda Accord DX Coupe, 1985 Honda Spree

    Build thread! https://www.3geez.com/forum/project-...upe-build.html
    [SIGPIC]

  11. #286
    LX User Jinnai's Avatar
    Join Date
    Jul 2020
    Vehicle
    1988 Honda Accord LXi Hatchback
    Location
    Colorado Springs
    Posts
    104

    Re: Bagged B18 '88 DX Coupe Build!

    Oh man, I love the panasonic cockpit so much too. I'll need to make some more ebay saved searches cause wow what a steal.

  12. #287

    Dr_Snooz's Avatar
    Join Date
    Jun 2007
    Vehicle
    1989 Accord LX-i
    Location
    Fresno, California
    Posts
    10,638

    Re: Bagged B18 '88 DX Coupe Build!

    Epic! So much win!
    Dr_Snooz

    "I like to take hammers, and just break stuff, just break stuff." - Beavis


    1989 Honda Accord LX-i Coupe, 240k miles, MT swap, rear disc swap

    Shop manual downloads available here: CLICK TO VIEW

  13. #288

    B0CKS's Avatar
    Join Date
    Jul 2016
    Vehicle
    1988 DX Coupe
    Location
    Detroit MI
    Posts
    334

    Re: Bagged B18 '88 DX Coupe Build!

    Quote Originally Posted by ShiRen View Post
    Wow speak of the devil, I wouldn't have gave it 2hrs more before I made and posted a "Honey its time for a build update post" meme just for you. I find it extremely strange the aem cam position sensor is incompatible with Hondata, or what I assume to be anything that expects the factory optical sensor... like why wouldn't it just use a factory optical sensor? Has aem squeezed more resolution out of it? Did anyone ever need any more cam position resolution? Im sure there is a market for a cop set up on Hondata or equivalent that does not use a gutted factory dizzy.

    Totally completely off topic, but have you considered a speedo and tach swap? I have been wanting to get rid of the cable speedo for a long time and you are going to be able to peg our tach. I bought a eg cluster banking on it working, I will have to get the speedo working with an arduino. I will share the code ofc, but I am also using the arduino for fuel level and you have trans options that can actually drive the speedo provided you wire it up.
    I swear I’ve typed a response to this at least once or twice, I just never get around to finishing it lmao! But I have thought about it, but I’m on the fence. With the Prelude speedo cable I’m running right now, that cable is nearly 100% out of sight, so there’s a part of me that says if it aint broke, don’t fix it, but on the other hand, the Rywire harness does have a VSS plug that’s just hanging. So that aint great. But Yeah, definitely got the problem of redline staring at me right in the face. I think I’m going to simply ignore it until my car works and it starts causing me problems lmao.

    Yeah, I’m 3 sorts of bummed, I had been working forward on assumptions, but I guess that AEM only saw a business case for it only if it promoted the rest of the AEM system, I’m sure there’s a reason for it. AEM uses a 24 crank signals per rev, over I believe the Honda factory 12, which is a total cluster. But yeah, strong agree, there’s a ton of unused space in the distributor that is all of useless, and thinking about how a “tucked bay” is practically a common Honda goal, the demand is certainly there. The thought’s crossed my mind to go reverse engineer one make it smaller, 3D print a mold, and lost cast my own out of frustration at AEM. But there’s bigger fish to fry lmao

    Quote Originally Posted by Jinnai View Post
    Oh man, I love the panasonic cockpit so much too. I'll need to make some more ebay saved searches cause wow what a steal.
    Definitely worth the time! I’m still reeling from it, right time, right place! Happens once every blue moon!

    Quote Originally Posted by Dr_Snooz View Post
    Epic! So much win!
    That deadline of having the car done just keeps moving back and back! So many fun things to do!
    Bagged, Type R swapped, eternal project 1988 Honda Accord DX Coupe, 1985 Honda Spree

    Build thread! https://www.3geez.com/forum/project-...upe-build.html
    [SIGPIC]

  14. #289

    B0CKS's Avatar
    Join Date
    Jul 2016
    Vehicle
    1988 DX Coupe
    Location
    Detroit MI
    Posts
    334

    Re: Bagged B18 '88 DX Coupe Build!

    Alright, lets go! Time for an update!

    I have some COOL STUFF. This post isn’t loaded with huge changes, but I’m still trying to get barn time in through the days. First and foremost, the COCKPIT IS HERE. Made it intact and looks to be in faaaantastic shape. I haven’t quit geeking out over it for like a two weeks straight. It’s literally in my line of sight right now, and it’s VERY distracting.
    Click image for larger version. 

Name:	Capture.JPG 
Views:	33 
Size:	85.1 KB 
ID:	10526
    Pardon my dusty appendages, but that gives you a quick jist of how it’ll hang in the car. LOVE all the knobs and switches, and I’m very excited to get in place.
    Click image for larger version. 

Name:	IMG_6140.jpg 
Views:	29 
Size:	161.9 KB 
ID:	10527
    That excitement found it’s vent in the form of brackets, as soon as I got in my possession, I started making marks, measurements and rough ideas. Its going to replace the rear map light, as well as utilize the mounting screws- so you can see that I was pulling measurements there.
    Click image for larger version. 

Name:	IMG_6145.jpg 
Views:	29 
Size:	278.5 KB 
ID:	10528
    Then, as for the front, there’s two screws that hold the seatbelt warning light/rearview mirror surround in place- I’ll be grabbing those, as well as one of the rear view mirror screws for what should be a solid trio of points. I’m running with a thinner gauge metal for the front, so we’ll see how it feels once it’s bent up and in place, but I think it should be okay for the amount of contact points and bends it’ll have. The two pieces of orange paper show the final design for these brackets- the rear will be 2mm thick, just like the original Panasonic bracket was. I also put in a HUGE lasercutting order to SendCutSend, so these brackets- updated fog light brackets, the airbox, the Prelude bumper adapter, my center console closeout plate, those speaker adapters and other small things are all in the mail, can’t WAIT for them to show up, gonna have a huge powdercoating session! And thanks to a few gift cards from some great contests from SendCutSend, that entire order set my wallet back six bucks- freaking LOVE their company!
    Click image for larger version. 

Name:	IMG_6202.jpg 
Views:	30 
Size:	343.9 KB 
ID:	10529
    And, just to mention it- I won’t be messing with the cockpit at all for functionality- I bought another amplifier- a Kenwood KAC-M1824BT- this will be mounting under the driver’s seat- and is essentially a floating head unit. The reason this specific amp was selected because of it’s Bluetooth capability- It doesn’t push out enough power to move a subwoofer, so I’ll be linking it to the Rockford Fosgate sub amp I already have wired in. Basically- the cockpit will provide AM/FM/Cassette input, then this Kenwood amp will handle Bluetooth and swapping sources, it will also be the main signal sender for the speakers, then the RF amp will send the sub signal. WHICH MEANS, that I’ll still have an open head unit. I’ve been mulling, and re-mulling over the concept of that fancy spectrum analyzer from a few posts up, but there’s a part of me that would like to just be done with it, and buy a blockoff plate, but there’s also yet another idea to turn it into a phone cubby, since I’m already using most of the storage the vehicle has. And if I’m going to make it a phone cubby, I might as well throw a wireless charger pad in there just for fun. I dunno. Lots of thinking, not a lot of decision making.

    But anyways- where were we? Oh right! Stuff. Also as promised from a couple posts back- the Prelude hubcaps made it! They’re in GREAT shape, and I also picked up some decent 14” steelies so that when the time comes- I’ll be ready to have them good to go. But, for the time being- more stuff in storage! Just like those Cowbells! (which I promise I haven’t forgotten about!)
    Click image for larger version. 

Name:	IMG_6213.jpg 
Views:	38 
Size:	239.2 KB 
ID:	10530
    Then, went and undid some work the other night- I directly spliced an aftermarket male radio connector into my dash harness a few years back, and well, I’ve since learned about jumper harness- and considering that the radio seems to be a fluctuating system for this build, I need it to be an interchangeable/common connector I can find more if it comes to it. So I pulled the dash and got wiring.
    Click image for larger version. 

Name:	IMG_6236.jpg 
Views:	32 
Size:	254.6 KB 
ID:	10531
    And, so I did that and my mechanic (Mitch) and I are FINAAAAAAALLY finally time to get some hours into this car, so after getting the harness back together, I reinstalled the dash and gave the car power and blew the main battery fuse. And with the fantastic help from Mitch, we’ve started to go through my homemade fusebox frame and sort out issues, which has been fantastic, although I certainly wouldn’t describe it as photogenic. So- we’re working through that in the mornings, and it’s been really good for the car. Picking up lots of things I didn’t know. But yeah, don’t really have a photo for that- so here’s the engine bay!
    Click image for larger version. 

Name:	IMG_6105.jpg 
Views:	67 
Size:	319.1 KB 
ID:	10532

    So until next time, and Happy Holidays! I hope you're all enjoying a great break after this insane year.
    Bagged, Type R swapped, eternal project 1988 Honda Accord DX Coupe, 1985 Honda Spree

    Build thread! https://www.3geez.com/forum/project-...upe-build.html
    [SIGPIC]

  15. #290

    Dr_Snooz's Avatar
    Join Date
    Jun 2007
    Vehicle
    1989 Accord LX-i
    Location
    Fresno, California
    Posts
    10,638

    Re: Bagged B18 '88 DX Coupe Build!

    AM/FM/cassette??? This is for retro appeal, I assume.
    Dr_Snooz

    "I like to take hammers, and just break stuff, just break stuff." - Beavis


    1989 Honda Accord LX-i Coupe, 240k miles, MT swap, rear disc swap

    Shop manual downloads available here: CLICK TO VIEW

  16. #291

    B0CKS's Avatar
    Join Date
    Jul 2016
    Vehicle
    1988 DX Coupe
    Location
    Detroit MI
    Posts
    334

    Re: Bagged B18 '88 DX Coupe Build!

    Hey! Hope you guys had some happy holidays! Mine were great, and being back in the office already is a bummer, but I’m excited to share the pretty large batch of updates that have been brewing- there’s plenty!

    Christmas- in reference to the car- was great! I greatly appreciated my family being willing to sponsor a couple items I’ve pined for for some time! The two largest items are a refurb’ed brake booster- one that doesn’t have the rust that mine so proudly displays, can’t wait to get it in the bay once it’s all painted! The other awesome gift is a set of floormats that have been on my mind for an easy few years! These black mats are plenty simple, and I think always help interiors look deep and bring the colors out to the surface!
    Click image for larger version. 

Name:	IMG_3428.jpg 
Views:	31 
Size:	230.7 KB 
ID:	10546
    Mocked up in the interior before they hit storage- I think once the Prelude seats are re-upholstered to have the center be black- the mats should really sing with them. And make the brown/burgundy sing all the better.
    Click image for larger version. 

Name:	IMG_3430.jpg 
Views:	30 
Size:	244.4 KB 
ID:	10547
    And on from that- I finally got around to fitting the car cover! It fits INCREDIBLY, and is well worth the price, it’s in great shape, and I’m stunned to have it! Very much a rare part at this point, and I can’t wait to one day lift it and show off the completed car.
    Click image for larger version. 

Name:	IMG_6409.jpg 
Views:	32 
Size:	237.7 KB 
ID:	10548
    With a pretty wild twist, I went junkyarding over the break and found myself with a whole trunkload of great parts! I was amazed to find a 2G Prelude, 3G Accord, and modded EK Civic all untouched in the lot! The 2G Prelude offered a practically new OE radio and rare EQ, a shift knob also in great shape, and the pull-em-when possible-2G front UCA’s. Oh! And a nice set of Si Front turns (story time!: The one’s that came with my bumper are both a little fubar, and I was able to find someone who was parting out a 2G Prelude, so I scored those, and then this 2G showed up in the yard… so now I own six. When it rains, it pours I guess.) Then the EK Civic was a pretty wild twist- it was a silver hatchback much like the Beanis I happened to own a couple years back. This one had suffered from a head on collision and was discarded by the owner before he parted it out- rather incredibly, I found a handful of really nice parts- the most notable being the barely-used Tein Flex Z Coilovers, that run about 850 out of the box, and these are like new. So I’ll just be flipping them! I also pulled the NRG adapter from the car, roughly a 100 dollar part, and should may stay in the nest if I do carry through with my next build. But anyways, I need to sell a LOT of this, so this should be the first and last time you see most of it! But yeah! Awesome day at the yard, and I found a crisp dollar in a puddle, which was very nice and fun.
    Click image for larger version. 

Name:	IMG_6333.jpg 
Views:	28 
Size:	368.4 KB 
ID:	10549
    Then the real beans of this post comes in from my large lasercutting order from SendCutSend- much to my excitement! Lets start with the easy stuff, like this here speaker adapter! As I’ve mentioned a few times previous, the Carrozzeria project has been ever-ongoing, but this is the breakthough part that should solve the big headache. And I cut four of them- so I’ll be able to retrofit another set for my next car! Pretty sweet IMO.
    Click image for larger version. 

Name:	IMG_6405.jpg 
Views:	34 
Size:	392.0 KB 
ID:	10550
    And, small as it is, here’s the center console closeout bracket- slides in and finishes off the outlets pretty nicely! It’s not too complex- just a couple bends and some powdercoat, but makes the outlet a lot more flush. The two large holes are for the eventual seat-warmer switches, and will be filled once I’m at the stage of re-upholstering, so for now- holes! Oh! And since it didn't make it into this update, I also updated the fog light brackets- they now hold them tighter into the bumper!
    Click image for larger version. 

Name:	IMG_6365.jpg 
Views:	29 
Size:	227.1 KB 
ID:	10551
    Then, possibly the brackets I’m most excited for- the Cockpit! I was really pleased with how these came out- a few simple bends in each and they really took the form they needed- there’s a few small asterisks that came with each, but nothing that isn’t imminently solvable. The front bracket grabs a total of five screws from the cockpit, then three from under the rear-view mirror. You can see it in place here.
    Click image for larger version. 

Name:	IMG_6346.jpg 
Views:	29 
Size:	288.3 KB 
ID:	10552
    Then the rear bracket is seen here in position replacing the maplight- it grabs two screws from the ceiling, then four downturned studs allow the cockpit to get seated.
    Click image for larger version. 

Name:	IMG_6352.jpg 
Views:	31 
Size:	195.1 KB 
ID:	10553

    Ope! Split post! Seeya in a sec.
    Bagged, Type R swapped, eternal project 1988 Honda Accord DX Coupe, 1985 Honda Spree

    Build thread! https://www.3geez.com/forum/project-...upe-build.html
    [SIGPIC]

  17. #292

    B0CKS's Avatar
    Join Date
    Jul 2016
    Vehicle
    1988 DX Coupe
    Location
    Detroit MI
    Posts
    334

    Re: Bagged B18 '88 DX Coupe Build!

    You can see what both brackets are doing here, along with trimmed rearview mirror bezel. I chopped off the back half (the one that displays the seatbelt warning lights) and should do a good job of tucking a few wires, along with tidying up the view of all this from the front.
    Click image for larger version. 

Name:	IMG_6350.jpg 
Views:	31 
Size:	372.8 KB 
ID:	10554
    So without further ado, here’s how it hangs! Fits GREAT- I couldn’t be happier, it tucks between the visors like it was from the factory, and follows the roofline with barely an issue.
    Click image for larger version. 

Name:	IMG_3431.jpg 
Views:	32 
Size:	129.0 KB 
ID:	10555
    And, while we’re talking about it- I made some calls about the stereo system that I’ll be able to update soon, but we have fed power to it, and it does emit some cool lights, we’ll be finding out how well it sounds before these next couple weeks are wrapped up. The harness to wire this monster is a whopping 13” feet long, and I was amazed I was able to reverse engineer it without too much of a fight. That said- it is huge, and without a sheath to hold it, and the way its haphazardly ziptied to a random selection of pillars and bits, it does look pretty sci-fi at the moment. I’m geeked, across the board.
    Click image for larger version. 

Name:	IMG_3441.jpg 
Views:	31 
Size:	180.9 KB 
ID:	10556
    Ope, and one more update- I decided to dump fourteen bucks and buy one truly non-essential part- this here custom air-freshner. I can’t tell you why I love it, or what I’m trying to express, but I find it perfect for the build. Nice.
    Click image for larger version. 

Name:	Capture.JPG 
Views:	38 
Size:	91.2 KB 
ID:	10557
    Continuing on our endless endless lasercut journey- The front bumper adapter came out pretty nice, unfortunately for my wallet, I think a second revision will be in the works to get everything properly- perfectly fit, but I did learn a lot with this iteration. The Black part is the lower bracket that clamps onto the lower flange of the bumper, and the green is the upper- eventually to be painted white.
    Click image for larger version. 

Name:	Capture1.JPG 
Views:	32 
Size:	106.6 KB 
ID:	10558
    The biggest issue is the alignment of the wheel well of the fender to rear bumper corner- it’s tough to see, but the bumper is pulled too far forward to be a seamless transition, much to my disappointment. But the quick releases- while they’re a bit clunky- are working as they should, but they certainly need lower attachment points to prevent bumper sag, which has been a bit of an issue with mocking this all up for the first time! BUT, I am pleased with this part and think I’m onto something that should be pretty clean once it’s all together. Other than some redesigns, I think what may also change is the hardware- I really like the feel of the allens, but they really want to grab your attention as reflective as they are- hood on or off. Black may be too dark, maybe there’s an workaround or middle ground I could find. TBD.
    Click image for larger version. 

Name:	IMG_6399.jpg 
Views:	35 
Size:	259.2 KB 
ID:	10559
    Then, FINALLY writing up the last two parts here- the airbox! It too- upon struggle and discontentment- while need one more round of work to be called done. But for starters, I finally swapped out the IAC bolts for threaded rods- which means I could now slide on a part I made a while back- the rear airbox support bracket- it fits REALLY nice, and is nearly entirely hidden from view, which does everything it needs to wonderfully. Huzzah! Scratch one off.
    Click image for larger version. 

Name:	IMG_6378.jpg 
Views:	30 
Size:	192.7 KB 
ID:	10560
    But the airbox itself- now that it’s made out of metal, is going to need another iteration. I was hoping to flange over one side and spotweld it on, leaving only the fourth side of the box to be a bolted on feature- but after much wrangling (and, well acceptable amounts of frustration and thought) I think I’ll be redesigning this part to have bolted on sides from both the left and right- making bending, assembly, and powdercoating all a much simpler process. I’m sure you’ll see what I mean in the future!
    Click image for larger version. 

Name:	IMG_6381.jpg 
Views:	34 
Size:	285.4 KB 
ID:	10561
    Happy 2021! Can’t wait to see what it brings!
    Bagged, Type R swapped, eternal project 1988 Honda Accord DX Coupe, 1985 Honda Spree

    Build thread! https://www.3geez.com/forum/project-...upe-build.html
    [SIGPIC]

  18. #293

    B0CKS's Avatar
    Join Date
    Jul 2016
    Vehicle
    1988 DX Coupe
    Location
    Detroit MI
    Posts
    334

    Re: Bagged B18 '88 DX Coupe Build!

    Quote Originally Posted by Dr_Snooz View Post
    AM/FM/cassette??? This is for retro appeal, I assume.
    Yup! Much like a lot of things on this car- I just think it's neat, modern functionality sometimes takes a back seat. But that said- I am working out a secondary amp to power the speakers that has inline bluetooth capability- allowing the Cockpit to be my quote on quote head unit- then the modern amenities will be tucked as best I can.
    Bagged, Type R swapped, eternal project 1988 Honda Accord DX Coupe, 1985 Honda Spree

    Build thread! https://www.3geez.com/forum/project-...upe-build.html
    [SIGPIC]

  19. #294
    LX User Jinnai's Avatar
    Join Date
    Jul 2020
    Vehicle
    1988 Honda Accord LXi Hatchback
    Location
    Colorado Springs
    Posts
    104

    Re: Bagged B18 '88 DX Coupe Build!

    Hnng, that Cockpit is incredible!

  20. #295

    B0CKS's Avatar
    Join Date
    Jul 2016
    Vehicle
    1988 DX Coupe
    Location
    Detroit MI
    Posts
    334

    Re: Bagged B18 '88 DX Coupe Build!

    Quote Originally Posted by Jinnai View Post
    Hnng, that Cockpit is incredible!
    Thanks so much!! I'm still in disbelief that there's one in the car- never- ever thought I'd see the day!
    Bagged, Type R swapped, eternal project 1988 Honda Accord DX Coupe, 1985 Honda Spree

    Build thread! https://www.3geez.com/forum/project-...upe-build.html
    [SIGPIC]

  21. #296

    Dr_Snooz's Avatar
    Join Date
    Jun 2007
    Vehicle
    1989 Accord LX-i
    Location
    Fresno, California
    Posts
    10,638

    Re: Bagged B18 '88 DX Coupe Build!

    More cool stuff. Do you have plans to change the color of the roof console at all?
    Dr_Snooz

    "I like to take hammers, and just break stuff, just break stuff." - Beavis


    1989 Honda Accord LX-i Coupe, 240k miles, MT swap, rear disc swap

    Shop manual downloads available here: CLICK TO VIEW

  22. #297

    B0CKS's Avatar
    Join Date
    Jul 2016
    Vehicle
    1988 DX Coupe
    Location
    Detroit MI
    Posts
    334

    Re: Bagged B18 '88 DX Coupe Build!

    Quote Originally Posted by Dr_Snooz View Post
    More cool stuff. Do you have plans to change the color of the roof console at all?
    SNOOZ! It's been an eon, I just finished my journey of falling off the earth and back- just catching up!

    I think the console will be staying the same, what's likely to change is the headliner itself- still undecided if I'll be finding some factory vinyl to overlay or if I'll be going to the great beyond from stock, but I'm content with the neutral gray of the cockpit I think!
    Bagged, Type R swapped, eternal project 1988 Honda Accord DX Coupe, 1985 Honda Spree

    Build thread! https://www.3geez.com/forum/project-...upe-build.html
    [SIGPIC]

  23. #298

    B0CKS's Avatar
    Join Date
    Jul 2016
    Vehicle
    1988 DX Coupe
    Location
    Detroit MI
    Posts
    334

    Re: Bagged B18 '88 DX Coupe Build!

    So…

    Suddenly its March! I guess I should have mentioned this, but I made a personal little vow that the next post I’d make on this site was after the Accord runs. And I mean, I was so close during New Years right? Well yes, but actually nope. But hey! Spoiler alert the car does indeed NOW RUN. HYA. Still got a lot of cash to spend and things to fix, but the huge hurdle of turn key is BEHIND US. January and the better part of February was all spent in the weeds sorting out little thing after little thing after little thing. Wiring being crossed, torque specs, blown fuses, you name it. Seemed like it would never end!

    Let’s start with the fuel system. What was wrong with it? Everything. Like nothing was right. But that’s fine! I know how to fix things. First problem I ran into? Leaky fuel rail. So, tore that out, rebuilt the thing, and so the first issue was fixed!
    Click image for larger version. 

Name:	IMG_6728.jpg 
Views:	29 
Size:	285.5 KB 
ID:	10615
    The second issue that popped up was a very large puddle of fuel forming under the back of the back of the car- leading me to one of few final “black boxes” of parts on this Accord I haven’t fiddled with yet. That was the gas tank. Never looked into it other than seeing the bottom of it, so it was time to drop it and figure out what was causing this headache. So, as you can see here, after spending some time disconnecting all the random fuel and vacuum lines this car surprisingly has, it was time to drop the tank.
    Click image for larger version. 

Name:	IMG_6741.jpg 
Views:	27 
Size:	257.1 KB 
ID:	10616
    And, well, the top of it was in nice shape! A quick initial clean, and it’s looking promising, no rust holes, a peak inside revealed some debris, but no lacquer, or dead things in it.
    Click image for larger version. 

Name:	IMG_6745.jpg 
Views:	30 
Size:	273.3 KB 
ID:	10617
    So, it was time to do that thing- take all the brackets and anything tiny and sandblast them thoroughly, and throw them in the powder coating oven. With the brackets cleaned up, I picked up all new fuel hose, figure it’s just good maintenance to replace ~30odd year old fuel line in practice, and with all new hose clamps to slide on as well, I was feeling pretty positive on how this was all cleaning up:
    Click image for larger version. 

Name:	Capture2.PNG 
Views:	31 
Size:	1.25 MB 
ID:	10638
    What was actually causing the leak was the fuel pump bracket- turns out the replacement pump I purchased has just a liiiiittle too much height to it, so the plate that mounts the pump to the tank was cracked open, so when it was torqued down, it was still staying open, then spraying gas off the top of the tank. So, ultimately I didn’t need to do a complete tank drop, but I think it was worthwhile to get my learn on about that system. So we buttoned everything back up, tried turning the key to get it to run again, and found that we were getting some coughs of life out of the number four cylinder, some on the number three, and so on. Those numbers correlate to what cylinders are closest to the positive pressure side of the rail, and after thinking upon it, I came to the conclusion that the pump was not up to the task. So, cracked open the rear panel again and installed an AEM 50-1000 fuel pump, significantly boosting the fuel pressure to a more than necessary number. It’s loud, but it works, so no problems there.
    Click image for larger version. 

Name:	IMG_6906.jpg 
Views:	27 
Size:	241.7 KB 
ID:	10620
    So there was also plenty of wiring gremlins to sort out, I took a solid three main 70Amp fuses to locate one of my wiring issues, found that the fuel cut off relay wasn’t happy because I no longer had an ignition coil, the coil on plug setup & distributor didn’t want to play nice, and plenty of other little issues of what went wrong, but here you go, after blood, sweat, tears, confusion and chaos, here it is, my rotary powered Accord:
    88 Accord First Start - YouTube
    We’re still a little bit of time away from a first test drive, clutch cable is currently “too short” and won’t let me go into gear while the car is running, so we’re sorting that out currently. That said, the engine has been broken in with a proper 20 minute run, and the idle has cleaned up some with that. Still gotta set ignition timing properly though. We’ll get there.

    So what’s next? Lets talk about the other HUGE development for this car- that’s right, I’m now in debt! How much, can’t quite say, but it’s somewhere around 12,000 dollars, and due before year’s end. That’s right, I’m lined up with a paint shop to begin the ROTISSERIE RESPRAY of the Accord this June, so I’ve got a LOT to do, and not nearly enough time to do it. Wrecks n’ Restorations is a shop currently out of Rochester Michigan, and after a shop tour, a handful of calls and conversations, are fully willing to cut our and repair all rust, fabricate everything I need to make this car lay frame, as well as build the cowl induction hood scoop I’ve talked about so much, fully undercoat the bottom of the car, as well as a proper respray in good in NH-512 Polar white, so I’m geeked, and pinching my pennies as fast as I can. I set up a few sheets as pointers on what the car needs, and trouble areas it has to save some headache, and am more than excited to get this project freaking GOING
    Click image for larger version. 

Name:	IMG_6817.jpg 
Views:	31 
Size:	210.6 KB 
ID:	10621
    Last edited by B0CKS; 03-08-2021 at 11:17 AM.
    Bagged, Type R swapped, eternal project 1988 Honda Accord DX Coupe, 1985 Honda Spree

    Build thread! https://www.3geez.com/forum/project-...upe-build.html
    [SIGPIC]

  24. #299

    B0CKS's Avatar
    Join Date
    Jul 2016
    Vehicle
    1988 DX Coupe
    Location
    Detroit MI
    Posts
    334

    Re: Bagged B18 '88 DX Coupe Build!

    With that massive deadline hanging over my head I’ve made a complete list of everything I need to do to the Accord in the next couple months. There’s a lot that’s going to be getting done while the car is gone, but in that leaves me with a lot of ideas I’ve had that need to get cemented ASAP so I won’t be drilling holes in fresh paint! So what sort of stuff does that include? Well, this:
    Click image for larger version. 

Name:	asdfasdfasfasdf.PNG 
Views:	27 
Size:	905.8 KB 
ID:	10637
    My phone is getting long in the tooth, and the next upgrade will probably be something with that witchcraft of wireless charging. And after thinking and thinking on it, I figure the best (and, well, probably cheapest) answer as to what I should do with my open factory radio slot is make a cubby for it. It’s simple, and the car doesn’t have much real storage space, I’ve crammed everything into every corner and hatch of this car, so some genuine storage wouldn’t be a bad thing at all. But, I can’t leave well enough alone, and have since designed a way to house the above guts of a wireless charger into the bottom of specifically shaped 3D printed part. Ya know.
    Click image for larger version. 

Name:	Capture.png 
Views:	28 
Size:	134.8 KB 
ID:	10623
    Also! Got the second 87 Integra lip I need to splice in half for proper fitment on the 2G Prelude bumper. A noble sacrifice!
    Click image for larger version. 

Name:	IMG_6723.jpg 
Views:	32 
Size:	275.0 KB 
ID:	10624
    Other small news includes more stereo wiring, built the Panasonic Cockpit harness, and also rewired my dash harness back to a factory radio plug, so I could build the jumper harness from the factory radio to this Kenwood amp, used to run the four speakers. The Kenwood, not sure if I’ve mentioned, is my effectively modernized head unit, allowing me have Bluetooth, along with the ability to switch input to the cockpit, a pretty, which is pretty exciting, sometime you can have your cake and eat it!
    Click image for larger version. 

Name:	IMG_6571.jpg 
Views:	29 
Size:	273.3 KB 
ID:	10625
    And while we’re talking tunes, I’ve somehow sorta blossomed into stereo equipment, repairing my Dad’s record player from his college years, and also getting into cassettes, you know, like a real nerd would. I had a total blast designing backer cards and playlists for a few hours of tapes, each one being a genre of music I enjoy, as well as a year I think fits it best. Nerdy, really nerdy, I know.
    Click image for larger version. 

Name:	Capture1.png 
Views:	28 
Size:	387.5 KB 
ID:	10626
    I’ll admit that the tapes I bought are from Walmart, and all sound like garbage, they were definitely intended for recorded voice or something, so all of them sound like garbled trash, so I’ll have to spend some big bucks and remake them later, but the Cockpit their intended for isn’t exactly up and running yet either, so I’ve got time.
    Click image for larger version. 

Name:	IMG_7046.jpg 
Views:	29 
Size:	207.9 KB 
ID:	10627
    Last edited by B0CKS; 03-08-2021 at 11:17 AM.
    Bagged, Type R swapped, eternal project 1988 Honda Accord DX Coupe, 1985 Honda Spree

    Build thread! https://www.3geez.com/forum/project-...upe-build.html
    [SIGPIC]

  25. #300

    B0CKS's Avatar
    Join Date
    Jul 2016
    Vehicle
    1988 DX Coupe
    Location
    Detroit MI
    Posts
    334

    Re: Bagged B18 '88 DX Coupe Build!

    Actually, come to think of it, I actually recently got another things that uses tapes. It happens to be a 1987 Civic. 100% Out of the blue, but I am once again, overlaiden with Hondas. Did not see it coming. Allow me to regale you with this story, that’s all of literally one week old.
    Last Sunday, I’m going through the Facebook bilge- same as ever- a while ago there’s this guy who made a post about selling an 87 Civic hatch, 1000 obo, says he’s moving and has to get rid of it. Don’t make too much of it. Well Sunday night comes around, says he’s moving out Thursday, car HAS to be gone before then, FIRST COME, FIRST SERVE. And well, I’ll be honest, the 3G Civic pages are about as active as this forum, there’s posts and activity, but no crazy rush, my comment, and one other guys make it to the post. I shoot him a message, tell him I’m into Hondas, send him some pictures of the car I’m supposed to be talking about in this thread, and we get to talking. To my amazement, the odometer reads 80K, the engine has been rebuilt (and still unfired at the time I’m writing this) and probably the straightest, most rust free Honda I’ve come to know. The catch? He’s three states south of me in Kentucky. So I call Wednesday off and make a trek down, bringing with me the wheels the Civic didn’t have and some tools. Grab a U haul once I’m in town, and pick it up. Can’t turn down a free car.
    Click image for larger version. 

Name:	sdfasfdsadf.PNG 
Views:	81 
Size:	2.76 MB 
ID:	10631
    Click image for larger version. 

Name:	sfdas.PNG 
Views:	78 
Size:	2.81 MB 
ID:	10632
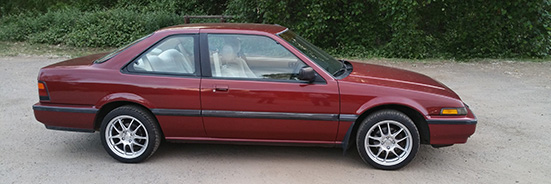
    And MAN, I’ll be honest, for FREE, I couldn’t be more blown away, this car very much has come value, and it’s nuts that I own it. The haul near the end was brutal, but I made it back in one piece, and the car really is in incredible shape. It’s an auto, and the previous owner says he broke the front pump of the trans when he mated the motor together, so that’s what halted the cars progress. Understandable. The car came with everything that’s come off of it, and so after getting the front end loosely back together, it looks far more respectable (and yes, long term readers, I picked up those Si Hubcaps a couple years ago and had them on the car known as the B-Cord, and they’re coming out of storage yet again to look sweet on this car) and really complete the cardboard box that makes me love these cars
    Click image for larger version. 

Name:	asdfassdafasfdas.PNG 
Views:	76 
Size:	2.75 MB 
ID:	10633
    And if I haven’t mentioned it, the interior on this car is near spotless, featuring the 3 spoke steering wheel that I adore, factory radio and awesome brown on brown action, it’s in great shape, and only needs a few pieces of plastic and a few tears in the driver’s seat addressed to be practically new.
    Click image for larger version. 

Name:	afawfaw.PNG 
Views:	83 
Size:	2.30 MB 
ID:	10634
    As it turns out, I have access to most of the plastic I need. Actually nearly everything I need to bring this car back to life. If you scroll up and back some, you might remember I laughingly put a 85 Civic front end on my Accord, and it turns out that the feces filled, mouse infested rusted wreck of a car that’s currently sitting in a junkyard is an absolute diamond in the rough. I made a list of everything that I’ve found that’s broken, scuffed or beat on the Tan Civic and went with my fists clenched and nose pinched last Sunday, and had a blast making a huge junkyard haul, this photo taken shortly after I had finished pulling perhaps the most crucial part from this blue hatch, the manual transmission.
    Click image for larger version. 

Name:	IMG_7001.jpg 
Views:	78 
Size:	270.7 KB 
ID:	10635
    That’s right- I’m manual swapping the Civic, which I think is a great idea, top to bottom. Now I’m sure you can tell by looking closely, but here’s what I pulled from the yard. Complete manual conversion (trans, flywheel, clutch ((buying a new one, don’t worry)), pedal cluster, cable, and shift linkage) optional rear mudflaps, optional passenger side rear view mirror, weatherstripping that was crumbling on the Tan car, A pillar trim- same story, two functional center dash vents (both toast on my car), new upper timing cover (one on my hatch was rattle canned gold), front bumper (tan hatch has some teeth missing, and both the turn signal lenses were toasted), and everything I need to convert it to the cooler-looking recessed headlight look of the pre-facelift car. Not totally necessary, but I think a nice thing. I’m so geeked at how much that was bad on my hatch was good on this car. I’m just too excited. And I should mention, all this, plus the new clutch that’s in the mail right now has only set me back 300 bucks. Really, really not bad all things considered, I can’t imagine trying to source all this otherwise, especially for that cheap!
    Click image for larger version. 

Name:	dfasdfsdf.PNG 
Views:	68 
Size:	2.37 MB 
ID:	10639
    Last edited by B0CKS; 03-08-2021 at 11:19 AM.
    Bagged, Type R swapped, eternal project 1988 Honda Accord DX Coupe, 1985 Honda Spree

    Build thread! https://www.3geez.com/forum/project-...upe-build.html
    [SIGPIC]

Similar Threads

  1. CAH:1991 Accord EX Coupe Build
    By Civic Accord Honda in forum Classic Honda Pics & Videos
    Replies: 1008
    Last Post: 04-11-2015, 09:10 AM
  2. slammed and bagged 3rd gen accord!
    By redneck in forum Suspension/Wheels/Tires/Brakes
    Replies: 11
    Last Post: 11-03-2012, 10:05 PM
  3. Kickin It Ol' Skool (That One-Off Build) '89 Accord Coupe
    By dacantu in forum Classic Honda Pics & Videos
    Replies: 181
    Last Post: 08-06-2012, 07:25 AM
  4. Burn1nRubb3r's 1988 DX Coupe DD Build
    By Burn1nRubb3r in forum Project Central
    Replies: 2
    Last Post: 05-16-2012, 10:38 AM
  5. 2drSE-i's '89 Coupe Supercharger Build
    By 2drSE-i in forum Project Central
    Replies: 34
    Last Post: 11-06-2009, 08:55 PM

Tags for this Thread

Bookmarks

Bookmarks

Posting Permissions

  • You may not post new threads
  • You may not post replies
  • You may not post attachments
  • You may not edit your posts
  •  
This website uses cookies
We use cookies to store session information to facilitate remembering your login information, to allow you to save website preferences, to personalise content and ads, to provide social media features and to analyse our traffic. We also share information about your use of our site with our social media, advertising and analytics partners.
     
Links monetized by VigLink