


So I was reading through Vectors thread on his b18 swap. His suspension setup was brought up, and helped lead me to a way in which we could run the civic struts without having to do any major modification. The problem up until now was that either the top hat had to be re-welded, or the lower piece of the strut must be modified (as I did in this thread) . With the setup Vector is running you would only need parts from a hardware store.
Whats required
1. 1988-1990 Front Civic struts (87's might work, but I can't verify that)
2. 8 - 4" carriage bolts that are 1/2" thick.
3. 4 - 86-89 Front Accord Top hats.
4. 9 - Primary Nuts that fit the carriage bolts.
5. 9 - Secondary Nuts that fit the carriage bolts.
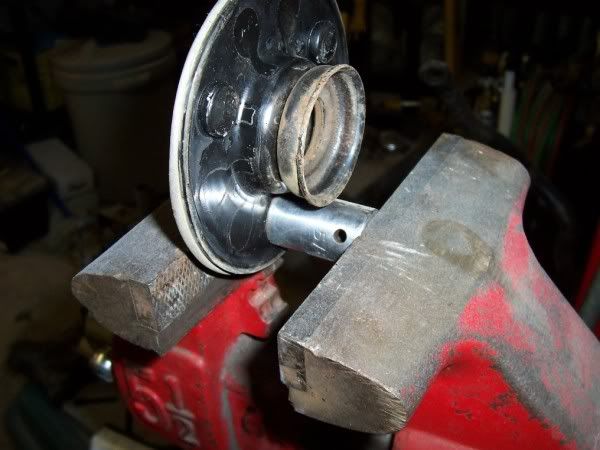
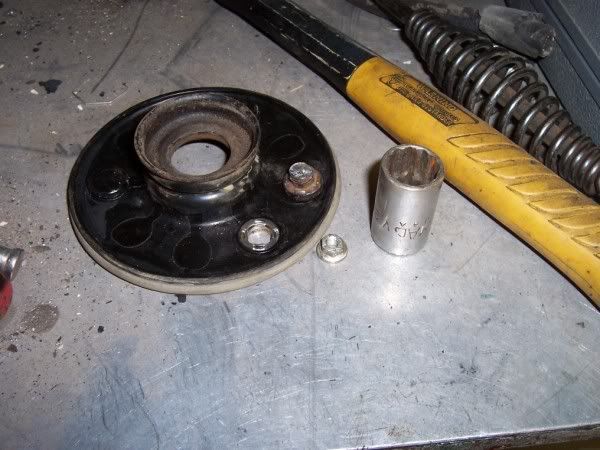
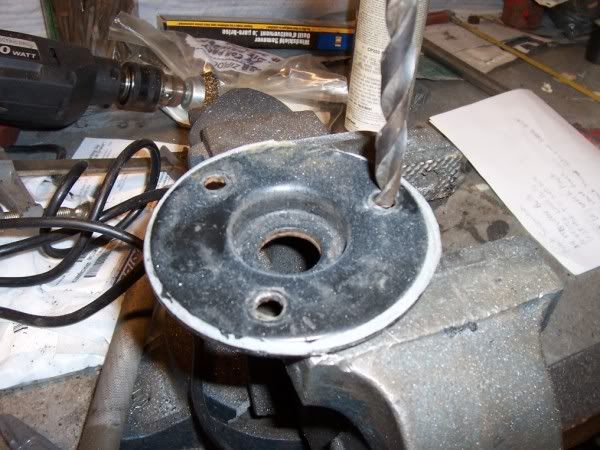
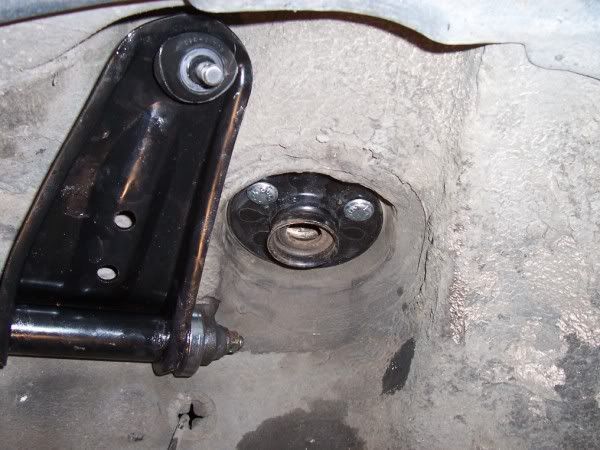
Step 1: First you must remove the studs from all 4 top hats
Cut and press out the hat studs, drilled out the holes so the carriage bolt fit nicely(didn't have to do anything to the fenders of the car), most carriage bolts i believe are flat on the end... so they wont obstruct the rubber washer to much... i had to cut some rubber away from the washer to make it fit properly.. but once i did it worked like a dream. Make the holes on the two bottom hats slightly bigger, because the bolts used are square after the thread ends.
Little note from Vector on this one
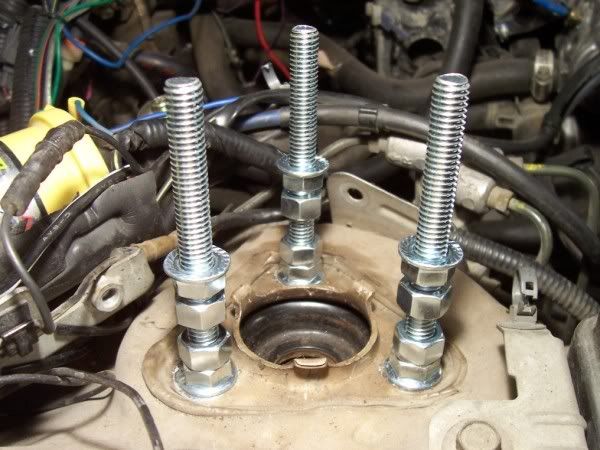
Step 2: Mount the lower top hats to the chassisOriginally Posted by Vector
Don't use any of the strut bushings, or washers that hold the strut to the top hat. Use the carriage bolts to hold the top hat in place. Use one of each kind of nut on the top of each carriage bolt.
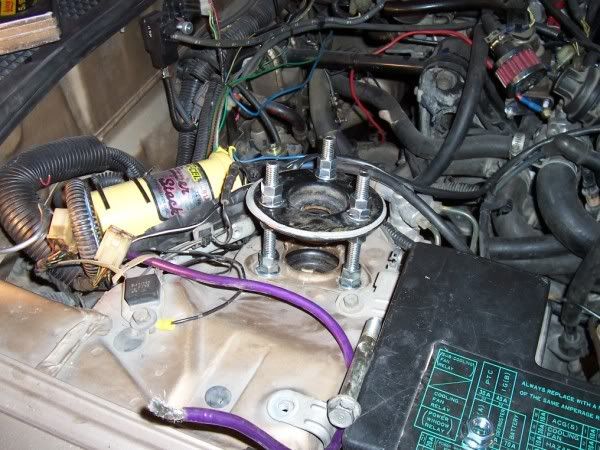
Step 3: Installing the second top hat
Place one of each kind of nut onto the carriage bolts, then place the top hat ontop of those. Now you must place 1 more of each kind of nut ontop of the top hat. This is how you adjust the hights for the strut travel. These bolts need to all be even.
Step 4: Mounting the strut
You can now mount the struts in the same manner as you would regularly. The only difference would be that you are mounting the strut to the top-top hat and not the bottom one.
Here is how Vector installed the struts.
This thread will be updated as I work with vector a little more. I already asked him if it was ok to make this thread, so we are all good thereput the top hat on.. put 2 nuts again on each bolt... flanged first then secondary.. do not tighten these.. as you will need to adjust the suspension once the shocks are in.
this is kinda a tricky part... i disconnected my sway bar to make this easier. i had my car on jack stands so i had the jack free...you will have to disconnect the upper control arms.. i just undid the 2x 17m nuts and let the arm fall out..
might not need to do this if your sway bar is not connected.. I'm not sure as mine already was.
so put the shock and spring in... no need for spring compressors here just keep the jack under the lca so it doesn't drop and pull the cv apart.. and seat the spring... make sure the shock shaft goes through the hole of the bottom hat... jack it up alittle so it stays there. go up top and put the washer and bushing for the bottom of the hat.. jack it up some more so it pokes through the top of the hat enough to get the top bushing and washer with nut on, nut the uca back in, you are done for that side, repeat for other side, reconnect sway bar and put front wheels on.. take off jacks... tighten shock nuts and set the hats to the desired level.
Warning: if you jack up the lca to much.. it can cause the car to become unstable on jack stands....i tightened up my shock nuts when the car was siting back on the ground. also.. i dont know if there are any side affects of the shock fully extending rapidly, idont know if it will damage it over time or not .. I've been pretty abusive with my oem shocks with this mod since the cars been back on the road and it still feels as stiff as the day i conjured this contraption.. Thanks again to Vector, and this really helps open a window for front suspension options.


 Reply With Quote

 .
.


Bookmarks