Page 1 of 8 12345 ... LastLast
Results 1 to 25 of 194

Thread: Step by step DIY Webber convertion + question

  1. #1
    LX User ADRIANFARINA's Avatar
    Join Date
    Mar 2010
    Vehicle
    86 Hatchback , 97 TL1000S , 39 Zundapp DB200 , 68 Vespa , 79 Derbi Variant , 96 CN250
    Location
    Tel-Aviv
    Posts
    359

    Post Step by step DIY Webber convertion + question

    I'll try and upload as many pictures as possible and make this thread as clear as I can .
    but I'll need your help with some questions I have ..
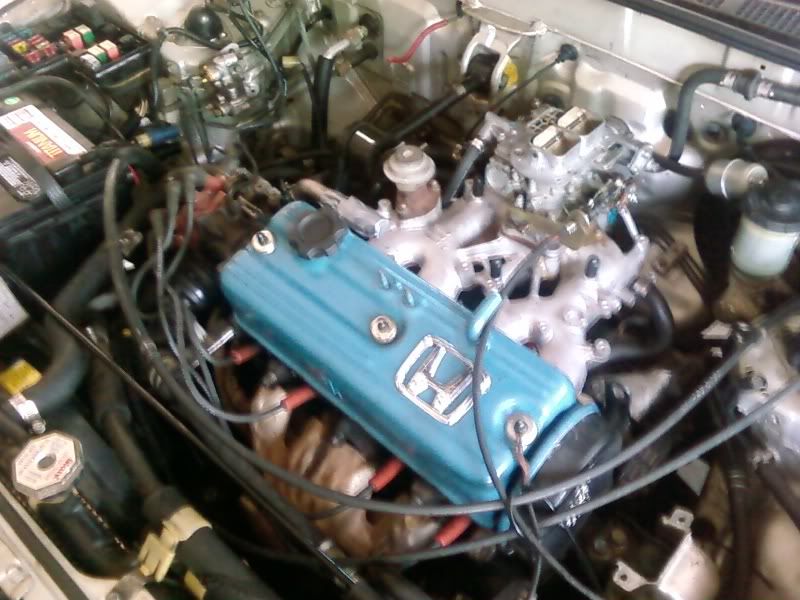
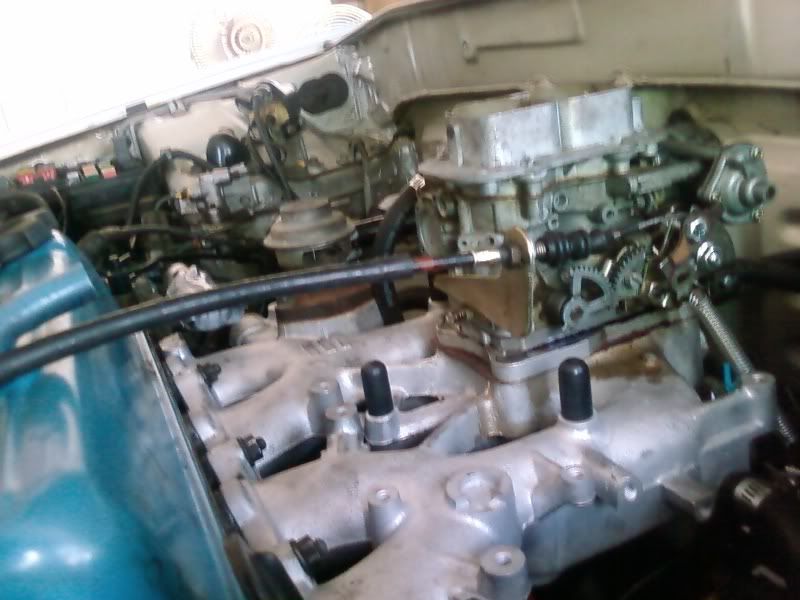
    I bought a new Redline Webber kit after deciding that rebuilding the original one doesn't worth it , also wanted to clear the engine bay .

    so here we go ..

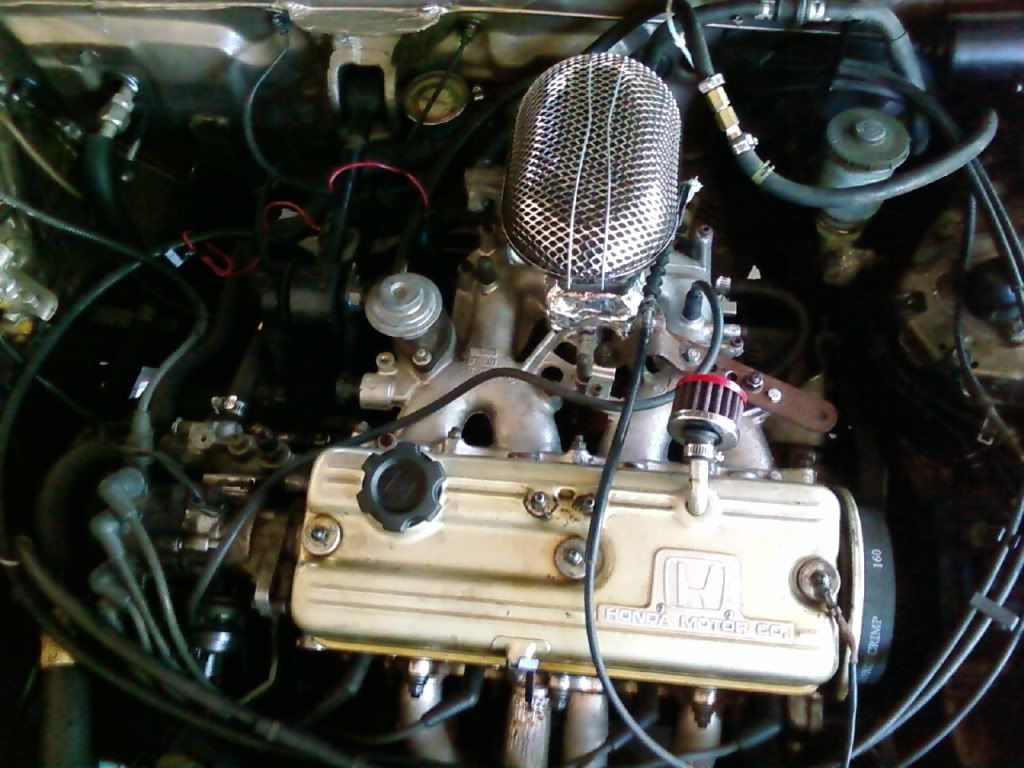
    this is the new kit:

    K&N filter


    adapter plates , bolts and levers


    and webber carb


  2. #2
    LX User ADRIANFARINA's Avatar
    Join Date
    Mar 2010
    Vehicle
    86 Hatchback , 97 TL1000S , 39 Zundapp DB200 , 68 Vespa , 79 Derbi Variant , 96 CN250
    Location
    Tel-Aviv
    Posts
    359

    Re: Step by step DIY Webber convertion + question

    started taking the old one apart:


    this gasket was really really stuck !


    taking the original bolts down


    a good clean


    closing the water hole in the inlet manifold with "liquid metal"


  3. #3
    LX User ADRIANFARINA's Avatar
    Join Date
    Mar 2010
    Vehicle
    86 Hatchback , 97 TL1000S , 39 Zundapp DB200 , 68 Vespa , 79 Derbi Variant , 96 CN250
    Location
    Tel-Aviv
    Posts
    359

    Re: Step by step DIY Webber convertion + question

    now a question ,
    I want to start taking stuff down , wich part should I leave and wich one can be taken ( A B C D E F ) ?


  4. #4

    2oodoor's Avatar
    Join Date
    Jun 2006
    Vehicle
    86 LX JDM B20A
    Location
    Georgia-lina
    Posts
    9,062

    Re: Step by step DIY Webber convertion + question

    Last edited by 2oodoor; 08-28-2010 at 11:28 AM.

  5. #5
    LX User ADRIANFARINA's Avatar
    Join Date
    Mar 2010
    Vehicle
    86 Hatchback , 97 TL1000S , 39 Zundapp DB200 , 68 Vespa , 79 Derbi Variant , 96 CN250
    Location
    Tel-Aviv
    Posts
    359

    Re: Step by step DIY Webber convertion + question

    I found two threads about this convertion , but both aren't completely clear (to me)

    here is one
    https://www.3geez.com/forum/showthread.php?t=38161

    and the one you posted
    https://www.3geez.com/forum/showthread.php?t=64982

  6. #6
    DX User
    Join Date
    Jan 2008
    Posts
    45

    Re: Step by step DIY Webber convertion + question

    Great post! I just picked up a 32/36 DFAV and will be doing this very soon. I look forward to your updates and hope to learn from this. Thanks for all the pictures they are a huge help, the more the merrier!

  7. #7

    A20A1's Avatar
    Join Date
    Sep 2001
    Vehicle
    2006 Chevy Cobalt LS
    Location
    Kaneohe, Hawaii, United States
    Posts
    88,734

    Re: Step by step DIY Webber convertion + question

    Quote Originally Posted by ADRIANFARINA View Post
    now a question ,
    I want to start taking stuff down , wich part should I leave and wich one can be taken ( A B C D E F ) ?
    A - Remove (Black Box)
    B - Remove (AJC)
    C - Remove (Hardlines)
    D - Remove (Solenoids, I think they are for Auto Idle)
    E - Remove (Air suction Valve Components, disconnect vacuum line to valve)
    E #2- Remove (AC or Cruise control) I believe you can still use the vacuum holding canister and Cruise control solenoids without the black box and what not, if you want to keep your cruise.
    F - Remove Secondary Thermovalve lines but keep the thermovalve in place.


    Which parts in the weber conversion threads were unclear? I don't mind rewriting things.
    Last edited by A20A1; 09-15-2010 at 07:13 PM.
    - llia


  8. #8
    DX User 87NoobMachine's Avatar
    Join Date
    Aug 2010
    Vehicle
    87 Accord LX
    Location
    Graham, Wa
    Posts
    21

    Re: Step by step DIY Webber convertion + question

    Quote Originally Posted by A20A1 View Post
    A - Remove (Black Box)
    B - Remove (AJC)
    C - Remove (Hardlines)
    D - Remove (Solenoids, I think they are for Auto Idle)
    E - Remove (Air suction Valve Components, disconnect vacuum line to valve)
    E #2- Remove (AC or Cruise control) I believe you can still use the vacuum holding canister and Cruise control solenoids without the black box and what not, if you want to keep your cruise.
    F - Remove Secondary Thermovalve lines but keep the thermovalve in place.


    Which parts in the weber conversion threads were unclear? I don't mind rewriting things.
    So, pretty much remove everything boxed in red?
    Last edited by A20A1; 09-15-2010 at 07:13 PM.

  9. #9

    A20A1's Avatar
    Join Date
    Sep 2001
    Vehicle
    2006 Chevy Cobalt LS
    Location
    Kaneohe, Hawaii, United States
    Posts
    88,734

    Re: Step by step DIY Webber convertion + question

    Quote Originally Posted by 87NoobMachine View Post
    So, pretty much remove everything boxed in red?

    If you want the simple answer, then yes
    - llia


  10. #10
    DX User 87NoobMachine's Avatar
    Join Date
    Aug 2010
    Vehicle
    87 Accord LX
    Location
    Graham, Wa
    Posts
    21

    Re: Step by step DIY Webber convertion + question

    Quote Originally Posted by A20A1 View Post
    If you want the simple answer, then yes
    What about the complicated answer? lol

  11. #11
    LX User ADRIANFARINA's Avatar
    Join Date
    Mar 2010
    Vehicle
    86 Hatchback , 97 TL1000S , 39 Zundapp DB200 , 68 Vespa , 79 Derbi Variant , 96 CN250
    Location
    Tel-Aviv
    Posts
    359

    Question Re: Step by step DIY Webber convertion + question

    today I've worked some more on the car ,
    there are some solenoids and other components that are connected to the vacoom lines , here they are :

    the big black box is going down , what about the small black unit with the three vacoom lines? also should be removed?


    this is the left wing (if you stand in front of the car) there are two solenoids mounted on that wing (one is the blue one) m and two vacoom lines connected to these two (one is line #20) , should I take them off?


    what about the lines that go to the dist. ?


    these two are mounted on the right wing and have vacoom tube that go inside the wing (!!) , should I take them down? and where do the lines go !?


    what do I do with the unit that's located near the valve cover (one that ends at the black plastic box and starts with the large metal tube)?


    these two are located on the top shock mount (right one) , and have vacoom lines connected to it , should I take it down?


    this are near the inlet manifold , take them down?


    what about the black box connector ? just leave it hanging..?

  12. #12

    2oodoor's Avatar
    Join Date
    Jun 2006
    Vehicle
    86 LX JDM B20A
    Location
    Georgia-lina
    Posts
    9,062

    Re: Step by step DIY Webber convertion + question

    note my picture, see anything missing... plenty

    Ok every vacuum line and appliance connected to one can be removed EXCEPT
    PVC valve
    Brake Booster
    Vacuum Advance on Distributor
    Cruise control if you want to keep it

    lines for windshiled washer remain

    Plug for black box can just be disconnected and tucked away in that grommet where it comes out

    A lot of vacuum ports need to be plugged off on the intake manifold, and a lot of bolts and brackets and junk can be removed
    Last edited by 2oodoor; 09-24-2010 at 09:05 AM.

  13. #13

    2oodoor's Avatar
    Join Date
    Jun 2006
    Vehicle
    86 LX JDM B20A
    Location
    Georgia-lina
    Posts
    9,062

    Re: Step by step DIY Webber convertion + question


  14. #14

    2ndGenGuy's Avatar
    Join Date
    Jan 2005
    Vehicle
    1981 Accord Hatchback, 1984 Accord Sedan
    Location
    Seattle, WA
    Posts
    9,697

    Re: Step by step DIY Webber convertion + question

    I always thought the small black box with 3 lines running into it is for California emissions models. I've never seen them on anything but California model cars. Was your car imported from the USA? You can remove that by the way. Pretty much as roodoo already said, you pretty much get rid of everything hooked to the carburetor in some form.

  15. #15
    LX User ADRIANFARINA's Avatar
    Join Date
    Mar 2010
    Vehicle
    86 Hatchback , 97 TL1000S , 39 Zundapp DB200 , 68 Vespa , 79 Derbi Variant , 96 CN250
    Location
    Tel-Aviv
    Posts
    359

    Re: Step by step DIY Webber convertion + question

    I suppose it's from the US..

  16. #16
    DX User 87NoobMachine's Avatar
    Join Date
    Aug 2010
    Vehicle
    87 Accord LX
    Location
    Graham, Wa
    Posts
    21

    Re: Step by step DIY Webber convertion + question

    Quote Originally Posted by roodoo2 View Post
    note my picture, see anything missing... plenty

    Ok every vacuum line and appliance connected to one can be removed EXCEPT
    PVC valve
    Brake Booster
    Vacuum Advance on Distributor
    Cruise control if you want to keep it

    lines for windshiled washer remain

    Plug for black box can just be disconnected and tucked away in that grommet where it comes out

    A lot of vacuum ports need to be plugged off on the intake manifold, and a lot of bolts and brackets and junk can be removed
    Is that your stock intake man.?

  17. #17
    SEi User turabaka's Avatar
    Join Date
    Aug 2007
    Vehicle
    1988 Honda Accord DX hatchback
    Location
    Boise, ID
    Posts
    1,564

    Re: Step by step DIY Webber convertion + question

    Quote Originally Posted by 2ndGenGuy View Post
    I always thought the small black box with 3 lines running into it is for California emissions models. I've never seen them on anything but California model cars. Was your car imported from the USA? You can remove that by the way. Pretty much as roodoo already said, you pretty much get rid of everything hooked to the carburetor in some form.
    I thought that was an air jet correcter of some variety. My hatchy had that, and I'm pretty sure it wasn't California emissions. I would go out and check, but I don't have the original hood anymore.
    Lostforawhile:we have to pick on him he's CAH he spray painted himself into this corner with the accord.

  18. #18
    LX User Xybris's Avatar
    Join Date
    Dec 2006
    Vehicle
    1997 Honda Domani, 1968 Ford F-100
    Location
    Japan!
    Posts
    240

    Re: Step by step DIY Webber convertion + question

    ^ I remember from my time working at Honda a mechanic saying it was some sort of altitiude compensator, standard for the 3gee, optional for the 2gee.

  19. #19

    car6289's Avatar
    Join Date
    Jun 2002
    Vehicle
    1989 Honda Accord LX , 2009 Honda Ridgeline & 2005 Honda Civic (1987 Accord LX - RIP)
    Location
    Abbotsford, B.C., Canada
    Posts
    220

    Re: Step by step DIY Webber convertion + question

    Quote Originally Posted by 2ndGenGuy View Post
    I always thought the small black box with 3 lines running into it is for California emissions models. I've never seen them on anything but California model cars. Was your car imported from the USA? You can remove that by the way. Pretty much as roodoo already said, you pretty much get rid of everything hooked to the carburetor in some form.
    By name it's the Air Jet Controller. It provides altitude compensation to maintain stoich air/fuel ratio by controlling the amount of air flow to the main and slow air jets of the primary carb throat. My car (made in Japan and imported in to Canada in 1989) is not California but has made several trips to the USA and there's one (AJC) under my hood. We have emission testing in my part of B.C., so a Weber conversion is out for now. I'll just continue to live with my under hood rubber jungle. I know it's between shit and syphillis.

  20. #20
    LXi User InAccordance's Avatar
    Join Date
    Jun 2010
    Vehicle
    1989 Accord LX Sedan / 2000 Accord EX v6
    Posts
    967

    Re: Step by step DIY Webber convertion + question

    mine has (well had) an air jet controller as well.
    car was purchased in Bristol, TN in 1988 and has never left this area.
    Granted I live in an area that on average is 2k feet above sea level so may have something to do with it.
    Originally posted by ShiRen:
    Nice car or not, nobody likes losing a race to an old 4 door Honda.

  21. #21
    LX User ADRIANFARINA's Avatar
    Join Date
    Mar 2010
    Vehicle
    86 Hatchback , 97 TL1000S , 39 Zundapp DB200 , 68 Vespa , 79 Derbi Variant , 96 CN250
    Location
    Tel-Aviv
    Posts
    359

    Re: Step by step DIY Webber convertion + question

    so...I can put this part in the bin .. right?

  22. #22
    SEi User turabaka's Avatar
    Join Date
    Aug 2007
    Vehicle
    1988 Honda Accord DX hatchback
    Location
    Boise, ID
    Posts
    1,564

    Re: Step by step DIY Webber convertion + question

    yes. You only need to keep one line for the distributor, one for the brake booster, and one for the pcv. Everything else can go. Everything!
    Lostforawhile:we have to pick on him he's CAH he spray painted himself into this corner with the accord.

  23. #23

    2oodoor's Avatar
    Join Date
    Jun 2006
    Vehicle
    86 LX JDM B20A
    Location
    Georgia-lina
    Posts
    9,062

    Re: Step by step DIY Webber convertion + question

    Quote Originally Posted by 87NoobMachine View Post
    Is that your stock intake man.?
    well.. I showed three different set ups Ive had, not sure which one youre refering to.
    Yes, all of them shown here are stock intakes on the outside but all have been ported out underneath the carb too varying degrees.
    This link is to my favorite set up
    https://www.3geez.com/forum/showthrea...t=65894&page=2

  24. #24
    DX User 87NoobMachine's Avatar
    Join Date
    Aug 2010
    Vehicle
    87 Accord LX
    Location
    Graham, Wa
    Posts
    21

    Re: Step by step DIY Webber convertion + question

    Quote Originally Posted by roodoo2 View Post
    well.. I showed three different set ups Ive had, not sure which one youre refering to.
    Yes, all of them shown here are stock intakes on the outside but all have been ported out underneath the carb too varying degrees.
    This link is to my favorite set up
    https://www.3geez.com/forum/showthrea...t=65894&page=2
    Wow, that's way too much work for me to comprehend, but it looks super nice. Just wondering cause i was looking under my hood the other day and wondering why yours looked so nice, lol
    .

  25. #25
    LXi User InAccordance's Avatar
    Join Date
    Jun 2010
    Vehicle
    1989 Accord LX Sedan / 2000 Accord EX v6
    Posts
    967

    Re: Step by step DIY Webber convertion + question

    Quote Originally Posted by 87NoobMachine View Post
    Wow, that's way too much work for me to comprehend, but it looks super nice. Just wondering cause i was looking under my hood the other day and wondering why yours looked so nice, lol
    .
    nah dude, it looks intense, but it's really the best part about a weber... you get to rip shit off your car and feel awsome about it!
    Originally posted by ShiRen:
    Nice car or not, nobody likes losing a race to an old 4 door Honda.

Similar Threads

  1. Step by Step SIG making in PS (as requested)
    By mkymonkey in forum Classic Honda Community Chat
    Replies: 14
    Last Post: 02-23-2010, 06:20 PM
  2. b18c step by step swap directions?
    By swell in forum General Engine Swaps
    Replies: 6
    Last Post: 12-24-2009, 07:40 AM
  3. HELP. Where is the weber how to step by step?
    By jdmaccordnut in forum Carburetor Tech
    Replies: 3
    Last Post: 10-25-2008, 10:07 AM
  4. step by step 32/36 weber install please??
    By myaccord7 in forum Performance
    Replies: 7
    Last Post: 02-19-2003, 01:46 PM

Bookmarks

Bookmarks

Posting Permissions

  • You may not post new threads
  • You may not post replies
  • You may not post attachments
  • You may not edit your posts
  •  
This website uses cookies
We use cookies to store session information to facilitate remembering your login information, to allow you to save website preferences, to personalise content and ads, to provide social media features and to analyse our traffic. We also share information about your use of our site with our social media, advertising and analytics partners.
     
Links monetized by VigLink